A Versatile GoPro Bicycle Mount
 GoPro Bicycle Mount.
After being hired to produce a film for Ciclismo Classico, a bicycle tour company specializing in hosting trips throughout Italy, the first thing I set out to do was figure out the best way to attach a GoPro Hero3 Black Edition camera to the bike to get the most interesting footage. After investigating a lot of solutions, I concluded that I wanted to position the camera off the bike. This ruled out all body mounts and most helmet mounts. I did find a rather cool propeller helmet mount that allows the GoPro to freely spin around on top of your head. The footage from this unique perspective was quite nice, but riding the bike with the camera twirling around on top of your head seemed rather difficult. I wanted a solution that would allow me to bike easily on the roads, in towns, and next to other bikes and vehicles that minimized the risk of smashing the camera into something else.
I decided that I wanted to place the GoPro behind, above the rider, and a little off to the side. This would produce a shot with the rider in the foreground and, of course, the scenery in the background. So, the plan was to figure out how to put together a mounting system to achieve that.
Telescoping Pole
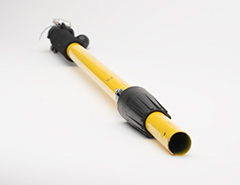 An old ice scraper with a telescoping pole was used for the GoPro bicycle mount.
I first mocked up the rig by clamping a pole to the frame in the back of the bike, and then connecting the GoPro to the end of the pole. This simple mock up confirmed that I liked the positioning of the camera, but also emphasized that it really needed to be placed off axis and not directly behind the rider. It also confirmed that the more height, the better.
So, the first hurdle was to find a long pole that I could pack in a suitcase. I accidentally came across a broken ice scraper that we had in the garage that was extendable. Ah ha! Eureka! What an obvious solution. By using a pole that telescoped inside itself, I could get almost twice the length of what could be fit in a suitcase. The ice scraper collapsed to 2′ 2″ and fully extended was 3′ 8″. First hurdle solved. I did not know it at the time, but this telescoping ability turned out to be very useful in the field.
Bike Rack
Next I wanted to connect the pole robustly to the bike. A search at my local bike shop yielded an excellent solution. The MTX BeamRack bracket. This bike rack clamps to the seat pole and can carry up to 20 lbs. Most importantly, it has a very wide, robust center shaft that extends backwards about 20″. This was great because it put the camera far back behind the rider, and had a great surface that could be used to attach a clamp. I also realized I was going to need extra carrying capability to tote around my DSLR and a second lens, so I also purchased the MTX TrunkBag EX that goes on the bracket. This bag worked out great. It slid beautifully on and off the bike. Also, it was large enough for what I wanted to carry, and the zippers worked great for quick access to my DLSR.
The Clamps
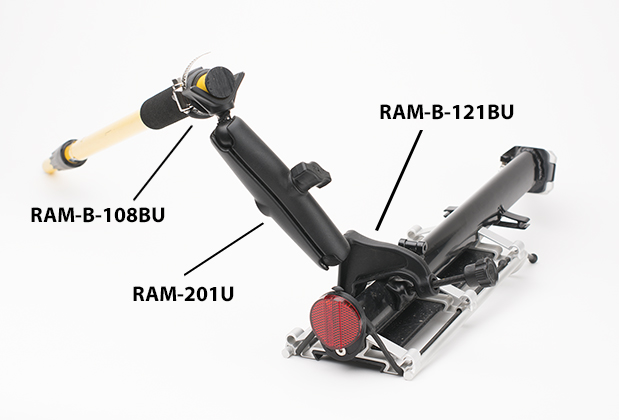
The final piece of the puzzle was to find an elegant clamping solution to connect the pole to the bike bracket. From the propeller helmet mount tutorial, I found these great, versatile mounting parts produced by RAM Mounting Systems.. They have a ball and socket system that works like a hip joint. They have several socket arms. I settled on the RAM-201U socket, the RAM-B-121BU RAM Yoke Clamp Base with 1″ Rubber Ball, and the RAM-B-108BU RAM V-Shape Base with 1″ Ball for Rails and Yokes.”
The RAM-B-121BU was clamped to the bike rack, and then the RAM-201U was connected to the ball. The other end of the RAM-201U was then connected to the RAM-B-108BU which itself was clamped to the pole. The GoPro was clamped onto the other end of the pole.
 GoPro bicycle mounting rig.
What was really exceptional about this solution was that with the ball and hip joint, the pole could be positioned at any angle. I was not limited to a pre-determined angle when the clamps were attached to their respective parts. Instead, I could adjust the angle at any time so desired. This turned out to be very useful.
I tested the rig for various camera angles before we left for the trip, so I had a very good idea what did and did not work. However, I did not put the system through a rigorous stress test on the bike. My first day out with the rig in Italy was not a good one. None of the clamps would hold their position for any length of time. I tighten things down very hard, but the bumps the bike encountered on the road were very stressful on each clamp, and, so, the rig would slide or turn. This included the GoPro clamps used to attach the camera to the end of the pole. To prevent the slipping, I brought pieces of thick rubber for just this purpose, so the next day out, I tightened the clamps down with this extra piece of rubber in between, and that resolved the slipping issue. I still had to refine the position of the rig after going over a bumpy section, but, for the most part, once I set the rig with the rubber pieces in place, it stayed.
Low-Mode Footage Was Awesome
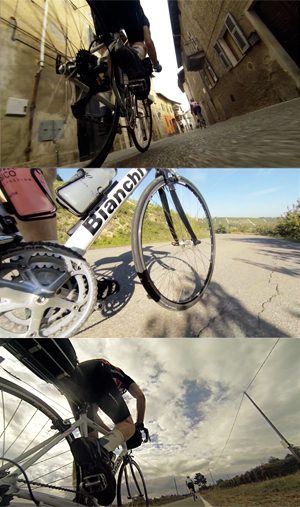 Three slightly different angles from the GoPro bicycle rig in low mode.
The results from the rig were great. I loved the footage from near the ground the most. The low-mode perspective gives a great sense of speed. What was cool was being able to extend the camera back via the long pole providing a perspective with more of the bike in some shots. Everyone who has seen the footage comments on this angle the most. But it did come with hazards! I put the rig in low mode while going down a steep hill with a lot of switch backs. The group had just gathered, so I was going to be able to follow the other bikes in close proximity which was going to be really interesting. However, when I took my first right-hand turn, I, of course, tilted the bike into the turn, and with that, drove the GoPro into the ground (yikes!). The camera was fine, but it was now pointing straight into the road. I didn’t realize it until we were off the mountain. Ugh!
The Versatility of the Rig Was Great
The mount was successful in many different positions. I liked pointing the camera away from the bike and passing the other bikers. This angle was also good at showing the country side. Pointing the camera backwards with bikers following me was also very effective. With the ability to finely tune the angle of the camera and the length of the pole, I was able to capture footage from behind the bike rider from a variety of different perspectives, each providing a novel way to view the scene.
GoPro App – Useful, But Power Hungry
I used the GoPro app on my smart phone sparingly because the WiFi mode just eats up the batteries. Since we were out all day, I was limited to the internal GoPro battery and two extra battery packs that I brought. This was more than enough battery power to run the GoPro all day, but not the WiFi mode. If I had unlimited battery power (on both the phone and the GoPro), I would have left it on the whole time. It’s nice to be able to see the GoPro screen, and then toggle the record button on and off right from the bike without stopping.
You can see as I set up the right-hand turn that this is going to be an awesome shot of the bikers just ahead of me, and then…
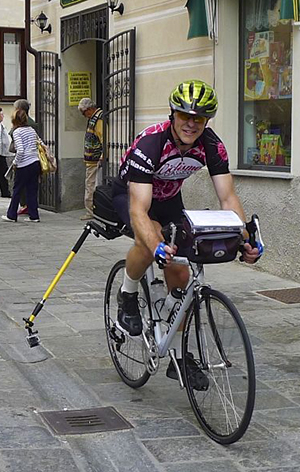
The Mount Was Successful for Practical Riding
The rig caught the attention of many locals. I was even saluted by a biker as he and his friends passed me going down a long hill (see the video snippet). I did have to be careful when we were biking in town. I had to make sure the rig was upright so I didn’t hit parked cars along the side of the road (I am proud to say I did not hit anything during the entire trip). The rig did fall off once (I should have tightened everything down each morning before we started). This was along an easy straight away, so I was able to stop, gather the pieces and re-attach very quickly. One other time the GoPro alone fell off while I was climbing a steep grade. Again, this was easy to fix. But it could have been rough if something came off while on a sharp descent.
 The GoPro bicycle rig in low mode.
 The GoPro bicycle rig in over-the-shoulder mode.
The weight of everything – the rack, the bag, the rig, and my DSLR and lens, was quite high. The guides were shocked at how much extra weight I was biking around, and commented that they would not like that. In a sport that kills to knock off grams of weight, I must have been quite amusing to them.
Conclusion
I think the shots from the GoPro helped the film tremendously. I was able to get interesting bike shots without the need of an assistant nor hiring something like a motorcycle – although I think being on a motorcycle to take the shots would have been the best thing to do! If I was a better bike rider, I could have been in and around the other bikers more often which would have yielded more shots to pick from. I should have paid attention to cleaning the GoPro more often. Many shots were rendered unusable due to moisture or junk on the casing in front of the lens. The last observation was that it would be nice to isolate the GoPro from the bike in a way so it wouldn’t be as susceptible to all the bumps. Every little change in the road topology was transferred directly to the camera resulting in shaky footage. Steadicam has released the Curve – a new rig specifically designed to stabilize the GoPro. It would be interesting if this could be incorporated into my rig to see if it would reduce the shakiness. A side benefit from using the GoPro was that it was nice to have so much footage of the trip from my own perspective. Reviewing the GoPro footage always takes me back to Italy and makes me smile.
Final Film: Piedmont – Land of Barolo and Truffles
I actually put together two versions of the film. The original is 6:11, but I found this to be too long to show to prospective clients, so I also put together a 1:40 version. Here are both versions. Enjoy!
Full length video for Ciclismo Classico.
Shorter version.